Solar Charge Controller Regulator(12V/24V ) 20A
Out of stock
EGP850.00
Out of stock
Features:
*20A Solar Charge Controller: Build-in industrial micro controller, automatically manage the working of solar panel and battery in solar system.
- *LCD Display: clearly indicate the status and data, it can be conveniently switched modes and parameter configuration, parameters adjustable, suitable for home, industrial, commercial etc. adjustable parameter.
- *Multiple Protection Functions: EEEkit solar controller has short-circuit protection, open-circuit protection,reverse protection, over-load protection and fully 3-stage PWM charge management, improve system efficiency and prolong the life span of the battery.
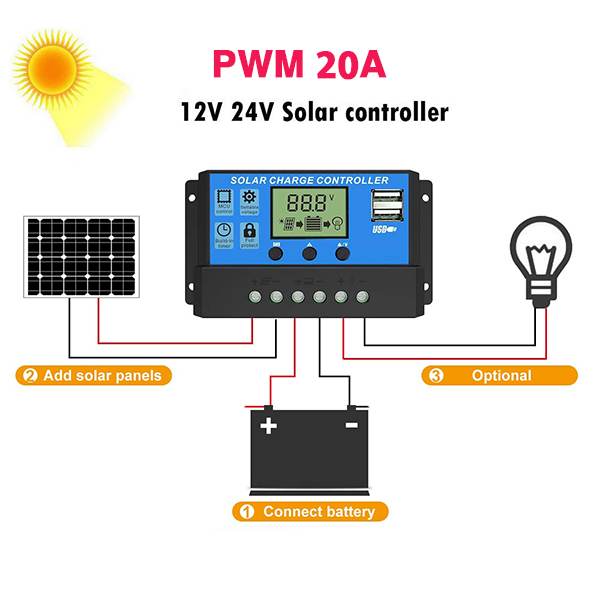
- Easy to Install and Operate: The charge controller should connect the battery first, then the solar panel, and finally the load! The disassembly sequence is contrary to the wiring order.
Eight PWM Charge Controller Protection:
- Dual MOSFET Reverse current / Overheat protection
- Under-voltage discharge protection / Short-circuit protection
- Open-circuit protection / Over-load protection
- Over-charging protection / Power off memory protection
- Suitable for farm solar power system, solar street light, solar patio light, solar billboards, outdoor camping solar system, ship solar system.

Common Q&A
How to install?
A: (1)Battery —>(2)Solar panels —> (3)DC load. Disconnect order is (1)DC load —>(2)Solar panels —> (3) Battery
Q: What battery type is this controller supported?
A: Pay attention to this regulator is only suitable for lead acid batteries: OPEN, AGM, GEL, not for nickel hydride, lithium, ions, or other batteries.
Q: Why the LCD screen become blank?
A: When the battery voltage is too low, the controller will stop to output ( ≦ 8V, controller turns itself off, LCD is blank, ≦ 10.7V (default), 12V output ports are not available); after the solar panels charging, it will re-output when the battery will return to 12.6V(default).
Q: Why does the controller display 14.4V?
A: If the solar charge controller is set to 12V, when the battery voltage reaches 14.4V or 14.5V, the solar charge controller will stop charging and play a protective role. If it does not enter the floating state, please don’t worry, the solar charge controller has a voltage limit value, will be not charge if the battery voltage reaches to 14.4V or 14.5V.
Q:How is it set to charge battery during the day and turn on at dusk?
A: Press the [DOWN]button to ON/OF load manully at main display (The load can’t be switched manually in the light control state.)
There are 3 options for the working mode.
Mode 1 : [24HR] >> Load output 24 hours
Mode 2 : [1-23HR] >> Load on aftersunset and dosed after setting hours
Mode 3 : [0H] >> Dusk to Dawn

SPECIFICATIONS:
- MAX charge and discharge current: 20A
- MAX input power and voltage:360W/23V(12V)
- Dual USB output:5V/2.5A(MAX)
- Equalization:14.4V
- Float charge:13.7V(default,adjustable) / Discharge stop:10.7V(default,adjustable) / Discharge reconnect:12.6V(default,adjustable)
- Charge reconnect:13V
- Battery option: b01=AGM/sealed b02=Gel b03= flood/open
- Size/weight: 5.86*2.87*1.3in/0.44lb
-
Battery Voltage: 12V / 24V
-
Charge Current: 20A
-
Working Temperature: -35¡æ
-
Self consume: 10mA
- Float Charge: 13V
SAFETY INSTRUCTIONS:
- Charge Controller should connect in the order of 1)Battery array 2)Solar panels 3)DC load .The disassembly sequence is contrary to the wiring order.
- Let the children keeps far away from the storage battery and the controller.
- Make sure batteries’s voltage between 9V-15V for 12Volt system and 18V-30V for 24Volt system so that the Charger controller can recognize the normal battery type and system in first connection.
- Parameter Setting Rules:Floating voltage > Low voltage reconnect > Low voltage discharge
- The solar controller will stop output when the battery under 10.7V(adjustable).The LCD will be blank when the battery under 8V and it will re-output when the battery up to the 12.6V(adjustable).
- Install the Charger controller to the battery as close as possible to avoid voltage and power dropping caused by overlong wire and affect normal voltage judgment.
- Connect the inverter (DC / AC) to the battery. DO NOT connect to the solar controller.
- The LCD display has an error of 0.2 V- 0.3 V, but this is normal .Do not open the heat sink of the solar controller without permission.
PACKAGE LIST
- 1 x 20A Solar Charge Controller
- 1X English User Manual


|
|
|
|
|---|---|---|
|
Layout LCD Screen Switch Button Battery Terminal USB Ports PV Terminal Load Terminal |
3C standard Using dedicated chips and dedicated software, can automatically manage the working of solar panel and battery in solar system. The various parameters set by the automatic memory can be saved in case of unexpected power failure, and the battery power consumption data will not be lost. |
SAFETY INSTRUCTIONS Let the children keeps far away from the storage battery and the controller. When installing for the first time, please make sure the battery has sufficient voltage so that the Charger controller can recognize the normal battery type and system. |



There are no reviews yet.